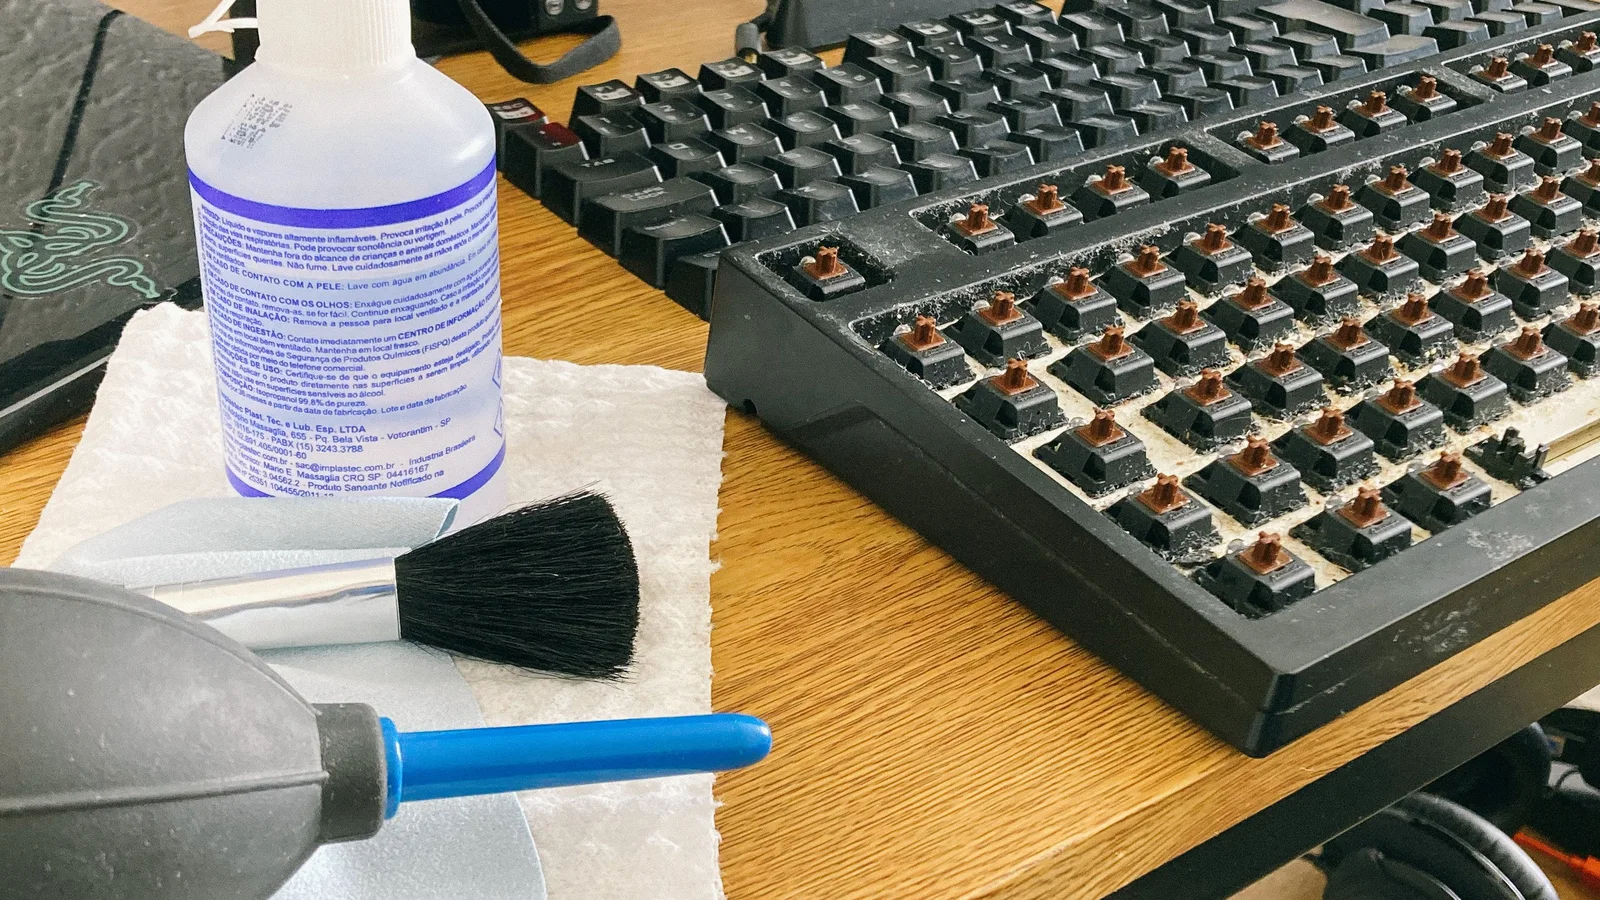
A mechanical keyboard does not need complicated care. A few minutes of dust removal, a gentle wipe, and sensible spill habits will keep it pleasant to use for years. The safest approach is to clean the part you can see without sending moisture into the electronics.
The short version: disconnect the keyboard first, use as little liquid as possible, never spray the board directly, and let every washable part dry completely before reconnecting it.
A simple maintenance rhythm
You do not need to follow a rigid calendar. Adapt the routine to how you use the keyboard, whether you eat at the desk, and whether pets or dust are nearby.
After a typing session: one or two minutes
- Wipe the keycaps and case with a dry microfiber cloth.
- Brush away crumbs with a clean, soft brush.
- Keep drinks on a stable surface away from the keyboard, not balanced beside it.
- If the keyboard has a dust cover, put it on once the board is cool and dry.
This removes skin oils and loose debris before they become a sticky film. Do not turn the board upside down over a desk while it is connected, and do not shake it aggressively.
Once a week: five to ten minutes
- Unplug the USB cable, switch off the keyboard, or disable its wireless connection. If it has a removable battery, follow the manufacturer’s instructions before cleaning.
- Hold the keyboard at a shallow angle and use a soft brush to lift debris from between the keys.
- Use short bursts of air across the gaps, keeping the can upright and the nozzle a little away from the board. Do not force dust deeper into the switches.
- Wipe the case with a barely damp cloth, then follow with a dry cloth.
- Check the cable, USB port, feet, and stabilized keys for wear or looseness.
Apply any cleaning solution to the cloth, never to the keyboard. Avoid household glass cleaner, bleach, abrasive sponges, and excess alcohol. A small amount of 70% isopropyl alcohol on a cloth can be useful for compatible hard surfaces, but check the manufacturer’s finish and keep it away from legends, screens, rubber, and openings.
Tools that are safe to keep nearby
- Two or three lint-free microfiber cloths
- A soft detailing or makeup brush reserved for cleaning
- A manual air blower or an electric duster used at low power
- A wire keycap puller for compatible mechanical keycaps
- A bowl, mild dish soap, and clean towels for removed keycaps
- Cotton swabs for the outside of tight corners
A small vacuum with a brush attachment can help collect loosened debris, but keep suction away from loose keycaps and exposed components. Never use a metal tool to scrape around switches or the PCB.
Deep cleaning, step by step
Deep clean when the board feels sticky, looks visibly dirty, or has accumulated debris over several months. If everything is clean and working normally, there is no benefit to dismantling it on a fixed schedule.
1. Prepare before removing anything
Take a photo of the layout, especially for non-standard or custom keycaps. Clear a well-lit workspace, disconnect the keyboard, and read the manufacturer’s instructions. Laptop and low-profile scissor keys are not interchangeable with mechanical keycaps: do not pull them off unless the manufacturer explicitly allows it.
2. Remove compatible keycaps gently
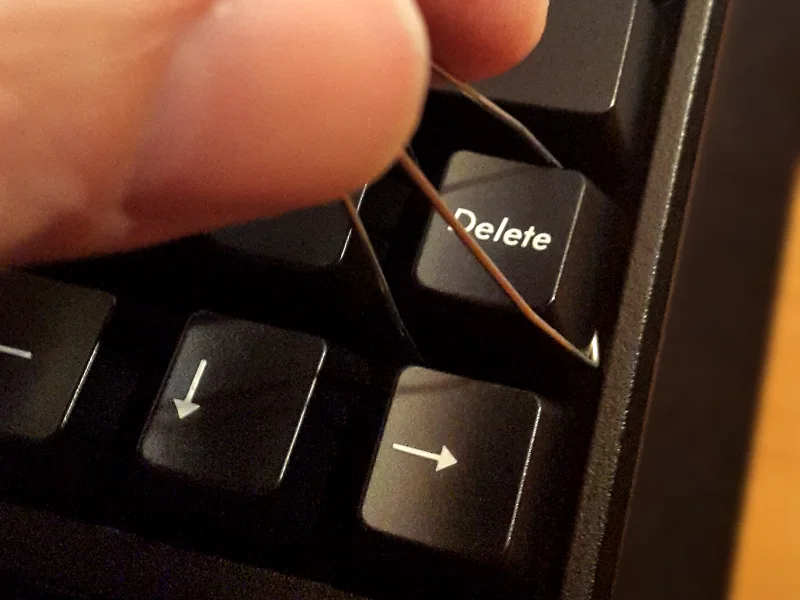

Place a wire puller around the keycap and lift straight up with even pressure. Start with ordinary letter keys, then approach the space bar, Shift, Enter, and other stabilized keys slowly. If a cap resists, stop and check that the puller is seated correctly. Twisting or forcing it can bend a stem or disturb a stabilizer.
Keep removed keycaps together in a bowl. Do not put the keyboard body, switches, plate, or PCB into water.
3. Wash and dry the keycaps
- Soak ordinary keycaps in lukewarm water with a small amount of mild dish soap for about 15 minutes.
- Agitate them gently and use a soft brush only where needed.
- Rinse until no soap remains.
- Spread them on a clean towel with the stems facing down and let them air-dry fully, preferably overnight.
Avoid hot water, dishwashers, abrasive cleaners, and hair dryers. Heat and aggressive chemicals can warp plastic or damage finishes. If a keycap has printed legends, unusual coatings, metal parts, or a soft-touch finish, follow its care instructions instead of assuming it is washable.
4. Clean the exposed board without flooding it
With the keycaps off, brush and blow loose debris away from the switches. Wipe the accessible case and plate with a dry or very lightly damp swab. Do not pour liquid into switches, sockets, stabilizers, or the PCB. If a switch is scratchy or inconsistent, cleaning the surface may not fix it; lubrication or replacement requires the correct product and skills.
5. Reassemble and test
Wait until the keycaps and any cloth-wiped surfaces are completely dry. Replace each cap using your layout photo, pressing straight down. Test every key, the space bar, stabilizers, LEDs, and the connection before returning to normal use.
What to do after a spill
Speed matters, but powering a wet keyboard to “see whether it still works” is risky.
- Disconnect the cable immediately or switch the keyboard off. Remove the battery only if it is designed to be removed safely.
- Unplug the computer end too if the liquid reached the cable or port.
- Blot the surface. Do not rub liquid farther between the keys.
- Turn the keyboard over or place it in a position that lets liquid drain away from the PCB. Do not shake it hard.
- Remove keycaps only if that can be done without spreading the spill.
- Leave it disconnected in a dry, ventilated place until it is fully dry. A sugary, milky, or salty spill may require professional cleaning even after the board appears dry.
- Inspect for residue, corrosion, or intermittent keys before reconnecting. If in doubt, contact the manufacturer or a repair technician.
Do not use a hair dryer, oven, radiator, or rice. Heat can deform parts, and rice does not remove residue or moisture from electronics.
A practical care schedule
| When | What to do |
|---|---|
| Daily or after use | Dry-wipe keycaps and remove visible debris |
| Weekly | Brush between keys, use controlled air, wipe the case and inspect the cable |
| Monthly or as needed | Remove stubborn surface grime and check for sticking, chatter, or loose stabilizers |
| Every few months | Remove and wash keycaps if the board needs it; inspect feet, ports, and keycap stems |
| After a spill | Disconnect immediately and wait for a complete inspection before powering on |
For troubleshooting a key that double-types or fails to register, see Troubleshooting Common Keyboard Issues. If you are deciding whether a change will alter the board’s acoustic character, Understanding Keyboard Sound explains the role of keycaps, foam, and the desk surface.
The goal is not a spotless display piece. It is a dry, comfortable, reliable keyboard that you can maintain without damaging the parts inside.